
Installing Virto Notifications & Alerts On-Premises
Before you begin, you need to make sure you have access to the server and your account must have the appropriate administrative privileges to install applications.
Download the package for your SharePoint version (for example Virto.SharePoint.SE.AlertsCustomizerWebPart.zip) and unzip it. It contains two folders:
- Virto.SharePoint.Alerts.Setup — the setup program (SetupSE.exe for SharePoint Server Subscription Edition, Setup2019.exe and Setup2016.exe for SharePoint 2019 and 2016), Deploy.ps1, the solution Virto.SharePoint.AlertWebPart.wsp and the modern web part package virto-alerts-reminders.sppkg (SharePoint 2019 and SE), as well as ReadMe.txt, ReadMeSPFx.txt (steps for the modern web part; SharePoint 2019 and SE), the license agreement, the version history and the list of third-party components;
- Virto.WebLicenseManager — Virto License Manager, installed or updated together with the product. See Installing and updating the License Manager.
Run the setup program as a farm administrator and follow the wizard: system check, license agreement, web applications and site collections, installation.
Starting with version 5.3.3, the setup program and the product libraries are digitally signed by UAB Virtosoftware.
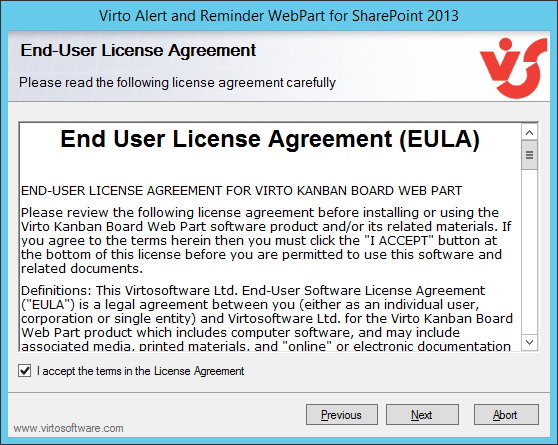
Note: the screenshots below show the setup wizard for SharePoint SE, except the License Agreement screenshot, which still shows the wizard for SharePoint 2013; the steps are similar for all SharePoint versions.

The wizard performs a system check prior to the installation. All the system checks must be completed successfully in order to proceed with the installation. After the checks have completed, click “Next”.

Check “I accept the terms in the License Agreement” and click “Next”.
On Site Collection Deployment Targets, select the web applications and site collections where the product is activated.
Warning: You must be logged in to the SharePoint server with a Site Collection Administrator account to automatically activate this feature.

Then click “Next”.

Click “Close” to complete the installation.

Installing with Deploy.ps1
Instead of the setup program you can use Deploy.ps1. In the SharePoint Management Shell, run as a farm administrator from the Virto.SharePoint.Alerts.Setup folder:
. .\Deploy.ps1
Install-WebPart -wspPath .\Virto.SharePoint.AlertWebPart.wsp -webAppURL https://<your web application>
The script installs or updates the solution and activates the product feature in every site collection of the web application. For the modern web part (SharePoint 2019 and SE), add -sppkgPath .\virto-alerts-reminders.sppkg -appCatalogURL https://<your app catalog site>: the script also uploads the package to Apps for SharePoint of that App Catalog; then open the catalog, deploy the package, and add the app to the site collections as described in SPFx Web Part Installation.
Site collection feature
The solution adds the site collection feature Virto Notifications & Alerts. Activating it creates the timer job, the product lists and, if the farm has outgoing e-mail, the Default SMTP connection. If the feature is not active in a site collection, activate it in Site Settings → Site collection features. Deactivating the feature stops all alerts of the site collection; their settings are kept.