
List settings
To find list settings in SharePoint On-Premises classic view, follow these steps:
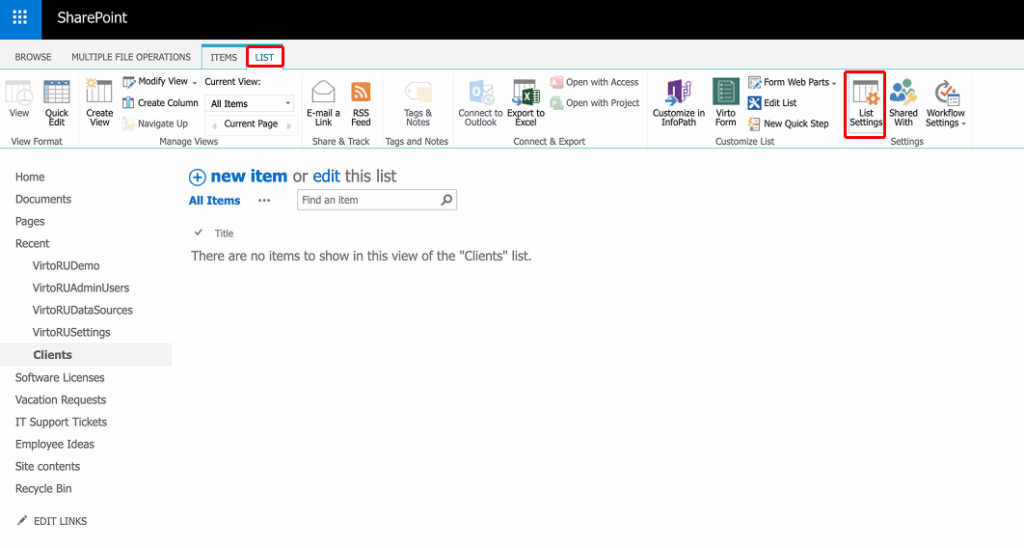
- Navigate to the SharePoint list you want to modify.
- Look for the “List” tab in the ribbon at the top of the page.
- Click on the “List Settings” button in the ribbon.
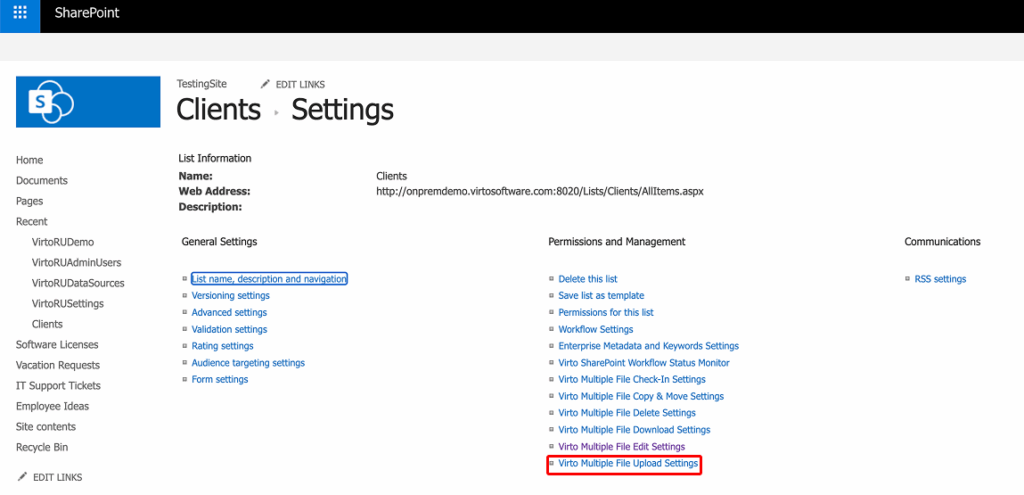
Find “Virto Multiple File Upload Settings” in the right column and click it.
Always follow web settings: use the site settings for this library. Clear the checkbox to set the options below for this library.

General Settings
- Overwrite existing files:
Enable this option to allow uploaded files to replace existing files with the same name in the destination folder. - Show “Overwrite” option:
Displays an overwrite checkbox during the upload process, giving users control over whether existing files should be replaced. - Allow changing destination folder:
When enabled, users can select or modify the destination folder for uploaded files. - Replace SharePoint invalid file name characters:
Automatically replaces invalid characters in file names with allowed ones during the upload process. - Enable “Set all files properties” button:
Adds a button that allows users to set properties for all uploaded files at once, streamlining metadata management. - Prevent uploading files without filling required fields:
Blocks uploads if mandatory fields in SharePoint are not completed for the uploaded files.
The option Check-in files on upload is set on the site and farm levels.
Other Settings
- Maximum upload size:
The maximum size of each uploaded file in MB; a larger file cannot be uploaded. If left as0, there is no limit. This option is not available on the farm level. - Allowed File Types:
Specify file extensions that are permitted for upload (e.g.,JPG, BMP, PNG). Leave empty for no restrictions. - Ignored files:
List file names (e.g.,Thumbs.db, Exclude.txt) that should be excluded from uploads. Leave empty for no exclusions. - Forbidden symbols:
Define symbols that will be automatically removed from file names during the upload process. - Allowed Fields:
Select predefined fields that will be available for editing during file uploads. Use the dropdown to choose from available fields.
Panel appearance
Panel size and Panel heading — see Settings levels and panel appearance.